Converting HTML to PDF with Puppeteer and Azure Functions


This is my first attempt at writing an article, so please be easy on me 🙂
Most of us have faced the task of generating a PDF at some point - whether it's an invoice, an employment contract, or something else. You might think it's a simple task and think you're smart enough and you said, "I'll find a package that can handle it." That is, until your project manager, comes to you with a sophisticated design.
Oh no, you think to yourself. This is going to be a pain in the ass. In this article, I'll try to spare you the hassle and guide you on how to create an Azure Function and use Peeputter to convert a HTML to PDF, just like you are already familiar with in a browser to print a web page to PDF.
What is Puppeteer ?
Puppeteer is a popular library for Node.js, created by the Google Chrome team. It gives you a simple way to control and automate a headless Chrome or Chromium browser using the DevTools protocol. With Puppeteer, you can launch a headless Chrome browser from your Node.js code and do things like take screenshots, generate PDFs, navigate pages, and more.
It's worth mentioning that there's a similar library called Playwright, which offers similar functionality to Puppeteer
My Development Environment
In my local environment, I have the following setup, and I use NPM to install dependencies:
- Operating system: test done on Windows 10 and Mac M2
- Node version: 16.17.1
- NPM version: 8.19.2
Install the Azure Functions CLI and Azure CLI
The first thing to do is to install the Azure Functions command-line interface (CLI) globally on your system. This will allow you to use it from any directory.
To install the Azure Functions CLI, you can use the following command in command prompt:
npm install -g azure-functions-core-tools
Once the Azure Functions CLI is installed, you can use it to create, develop, and deploy Azure Functions.
In addition to the Azure Functions CLI, we will also need the Azure CLI, which we will use later to fetch settings. You can install the Azure CLI by following the instructions provided on the Microsoft Learn website.
After installing the Azure CLI, run the following command to connect to your Azure account:
az login
Create the Azure function in Azure
There are several methods to create an Azure function, such as using Visual Studio or Azure CLI. Anyway, for this article, I'll choose to do it on the Azure portal website.
- Go to the Azure portal: https://portal.azure.com/
- Search for "Azure Functions" and select it from the results
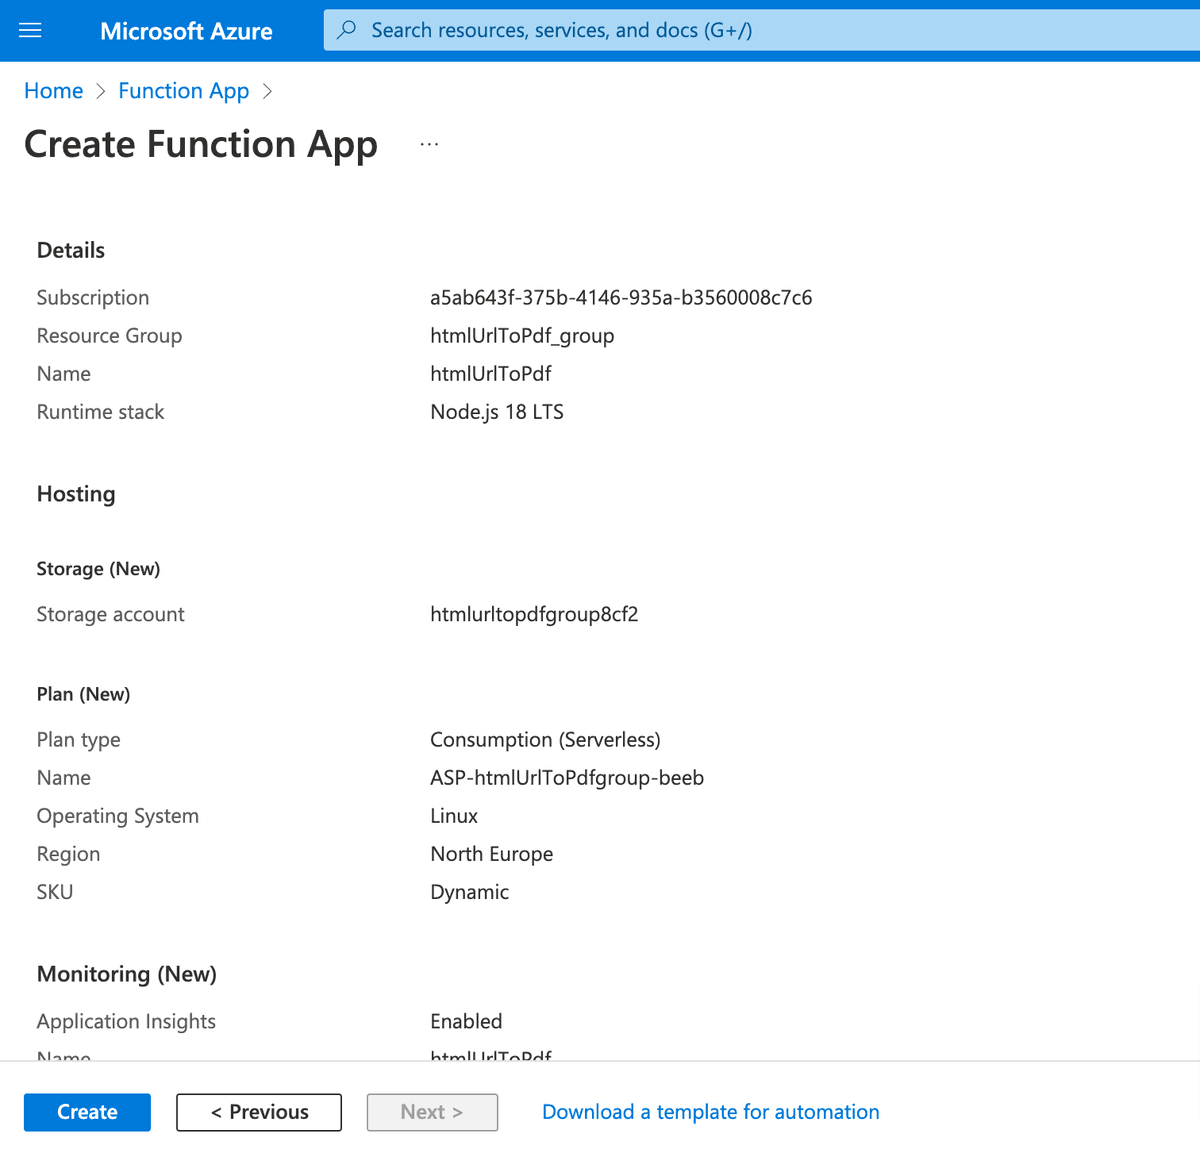
- Click on "Create" and give your function a name. Select the runtime stack as NodeJS and version 18 LTS. Most importantly, select the operating system as Linux since it supports building for production, which we'll do when we deploy our function.

Finally, when you finish creating the function, you will have something like this:
Create and run the Azure Functions locally
- Open a terminal or command prompt window.
- Create a new folder for your function app using the following command:
mkdir azurefunctionsapp
Navigate to the folder using the following command:
cd myfunctionapp
Use the following command to create a new function app:
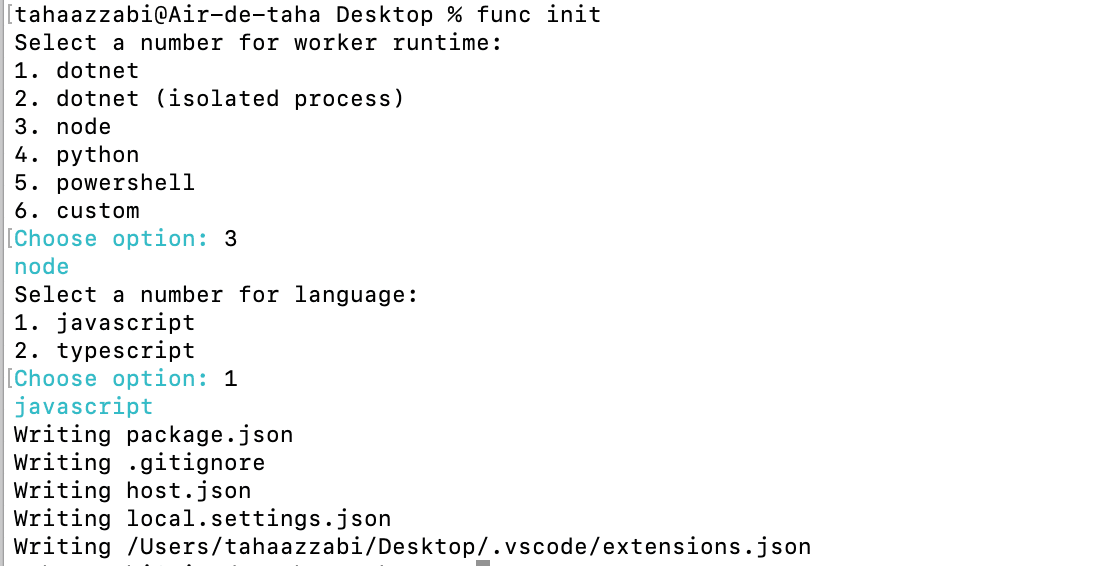
func init
Choose Node for worker runtime and JavaScript as the language for your function:
Use the following command to create a new function within the function app:
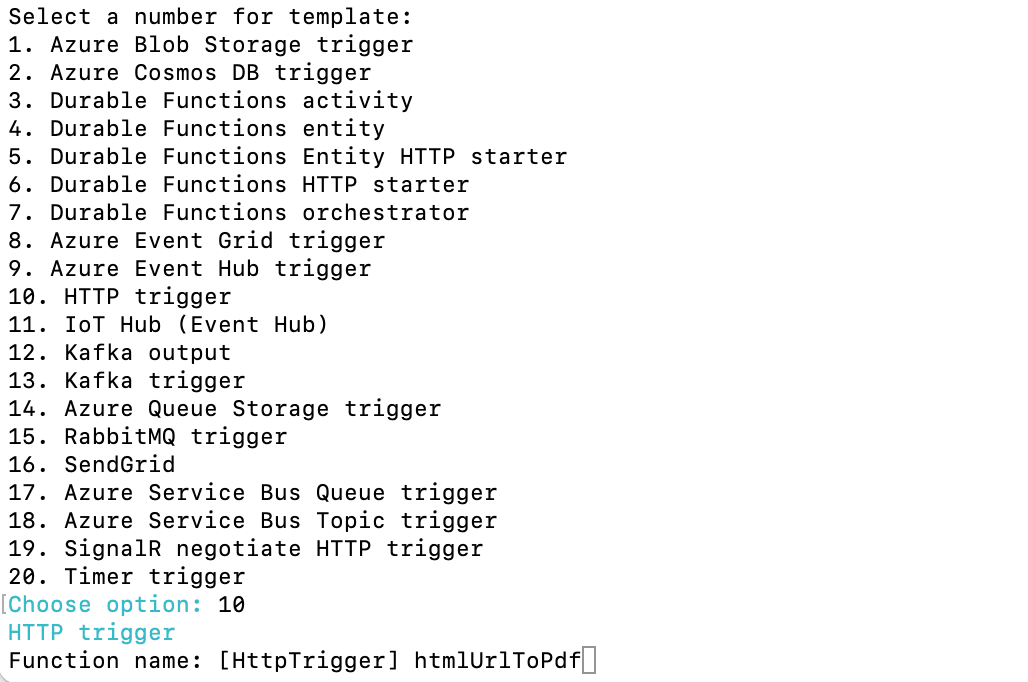
func new
Choose an HTTP trigger template for your function, and give a name to your function
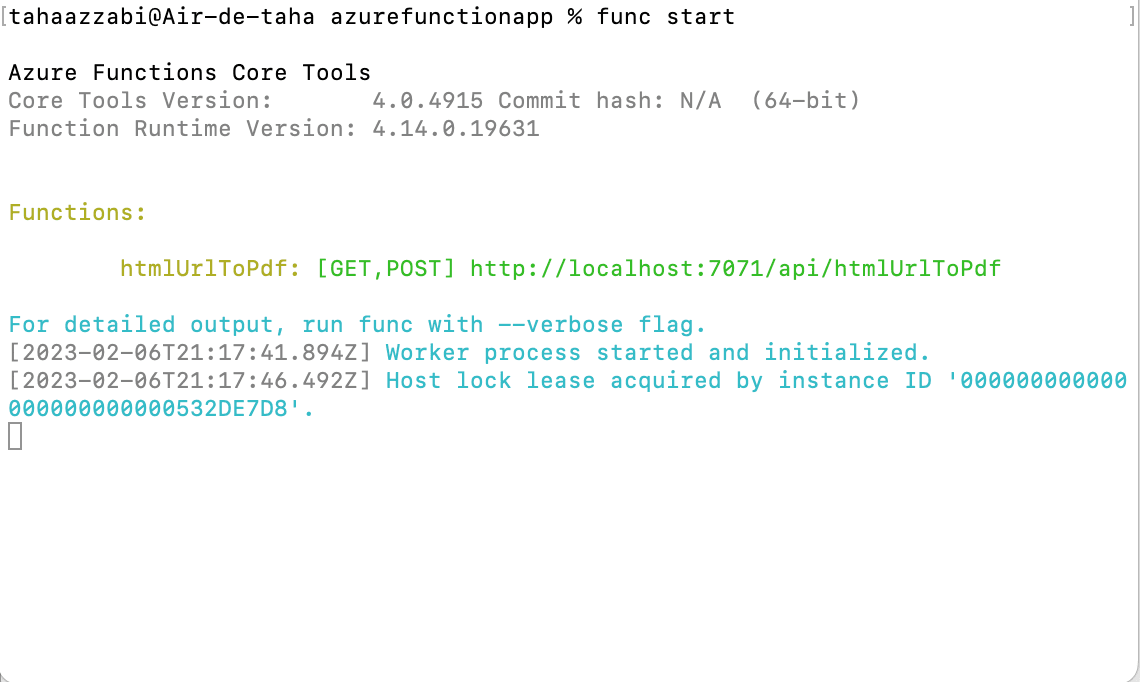
Use the following command to start the local development server:
func start
If everything is okay, you will see the URL to access the function on your local.
Generate a PDF from a HTML page web using Peeputter.
Finally, we will write some code, but before we do, we must install Puppeteer.
npm install puppeteer
Then, you need to create a configuration file named .puppeteerrc.cjs
to specify where to download Chromium for Puppeteer. For more information, refer to this link: https://pptr.dev/troubleshooting#could-not-find-expected-browser-locally
.
const { join } = require("path");

/**
 * @type {import("puppeteer").Configuration}
 */
module.exports = {
  cacheDirectory: join(__dirname, ".cache", "puppeteer"),
};
Then go ahead to the folder of your function and replace the index.js with the code below, notice that I disabled the Sandbox mode.
const puppeteer = require("puppeteer");

module.exports = async function (context, req) {
  try {
    // Check if the URL is passed as a query string
    if (!req.query.url) {
      context.res = {
        status: 400,
        body: "Please pass a URL on the query string",
      };
      return;
    }

    // Launch the browser instance with specified args
    /**
     *  IMPORTANT: Without these settings, the function will crash on production.
     *  Otherwise, you need to configure a Sandbox on Azure.
     *  See: https://pptr.dev/troubleshooting#setting-up-chrome-linux-sandbox
     */
    const browser = await puppeteer.launch({
      args: ["--no-sandbox", "--disable-setuid-sandbox"],
    });

    // Create a new page
    const page = await browser.newPage();

    // Go to the specified URL
    await page.goto(req.query.url);

    // Generate the PDF
    const pdf = await page.pdf({ format: "A4" });

    // Set the response headers and body
    context.res = {
      headers: {
        "content-type": "application/pdf",
        "content-disposition": "attachment; filename=mon-supper-pdf.pdf",
      },
      body: pdf,
    };

    // Close the browser instance
    await browser.close();

    // Call the context.done() method to indicate the completion of the function
    context.done();
  } catch (error) {
    context.log.error(error);

    context.res = {
      status: 500,
      body: "An error occurred while converting the page to a PDF.",
    };

    return context.done();
  }
};
The last required step is to ensure that Puppeteer will run installation after the project installation. I know this is weird, but for more information, refer to this link: https://github.com/puppeteer/puppeteer/issues/9192
To do so, open the package.json and add "postinstall": "node node_modules/puppeteer/
your package.json should look like this:
{
  "name": "",
  "version": "1.0.0",
  "description": "",
  "scripts": {
    "start": "func start",
    "postinstall": "node node_modules/puppeteer/install.js"
  },
  "devDependencies": {
    "azure-functions-core-tools": "^4.x"
  },
  "dependencies": {
    "puppeteer": "^19.6.3"
  }
}
Deploy the function on production
Before deploying, make sure to synchronize the function app settings from Azure to your local machine, as deployment failure may occur otherwise. For more information on the issue : https://stackoverflow.com/a/71311555/1087623.
func azure functionapp fetch-app-settings <functionappname>
Voila ! The final step is to deploy and build the function on production.
func azure functionapp publish htmlUrlToPdf --build remote
Enjoy!
